English guide to checking the IP address and setting a static IP on Becke indoor stations, including i51W, i52W, i53W, and i56A, with device-side and web-based configuration methods.
Before commissioning or maintaining an indoor station, users often need to confirm the current IP address or change the network mode to a static IP. This guide explains the practical methods for checking the IP address and configuring a static IPv4 address on Becke indoor stations. The procedures below are based on the interface logic shown in the original HTML content and are written in a clearer English support style for installers, technicians, and project teams.
Applicable Models
This guide applies to the following indoor station models: i51W, i52W, i53W, and i56A.
Target Audience
This document is intended for users, installers, and support personnel who need to identify the device IP address or switch the terminal from DHCP to a static IP deployment.
How to Check the IP Address
Checking the IP Address on i51W and i52W
Method 1: Check the IP address on the device screen
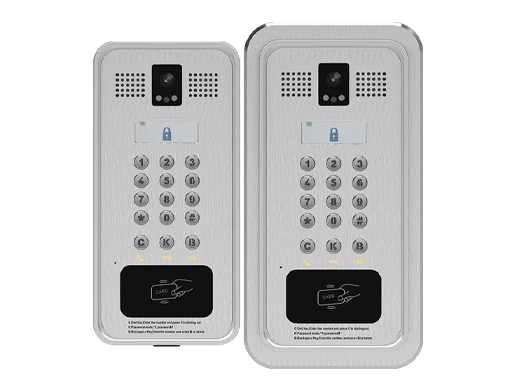
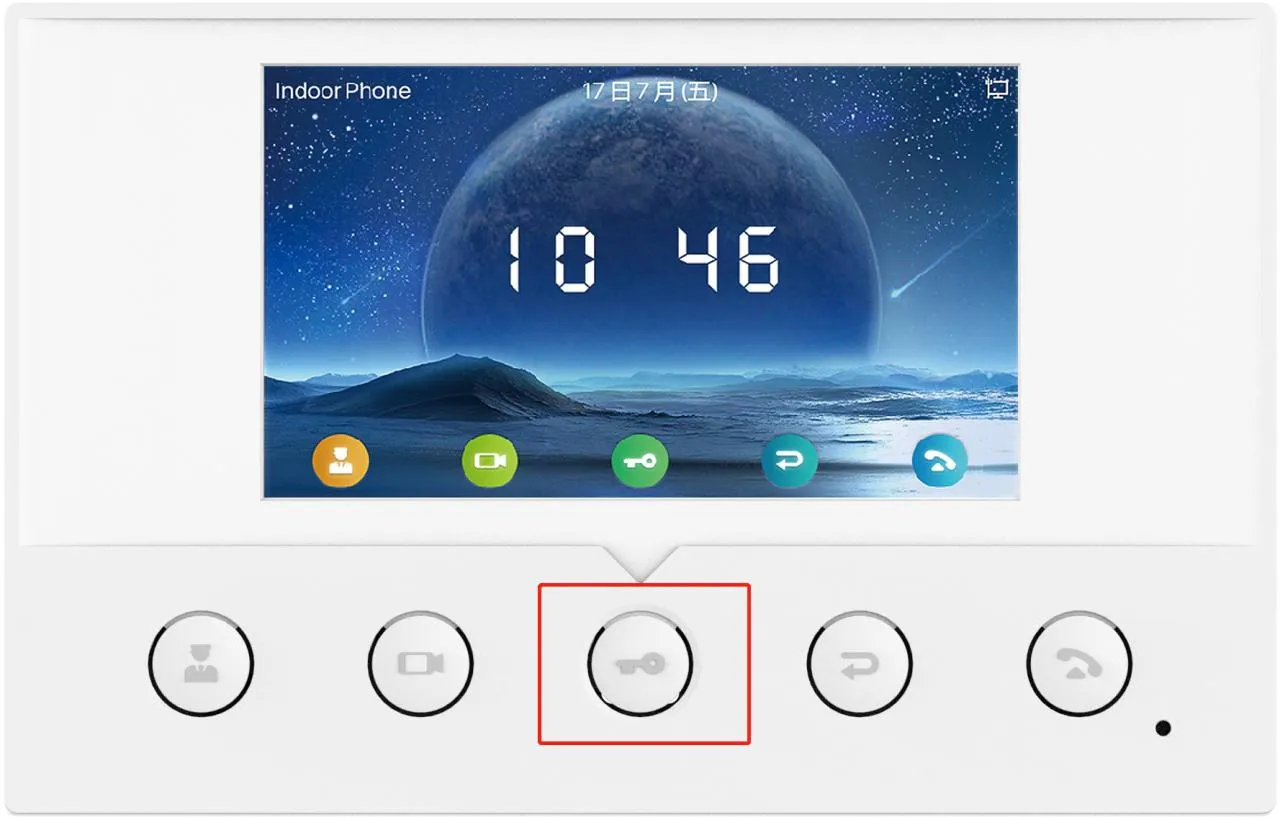
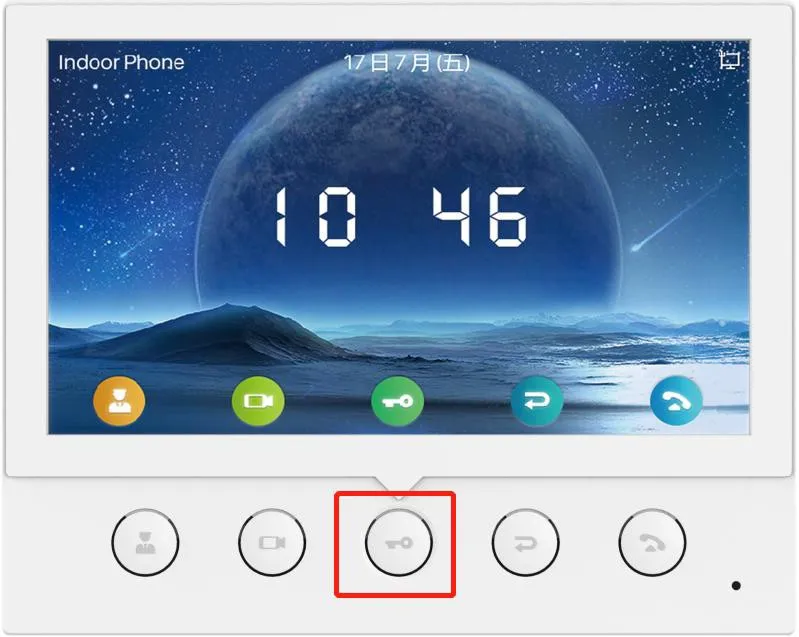
Press and hold the key shown below for about 3 seconds to enter the device menu on the i51W or i52W. After entering the menu, go to System Information → Network → IPv4. The current device IP address will then be displayed on the screen.
Figure 1. i51W key illustration.Figure 2. i52W key illustration.Figure 3. IPv4 information screen on the i51W and i52W.
Method 2: Use the IP scanning tool
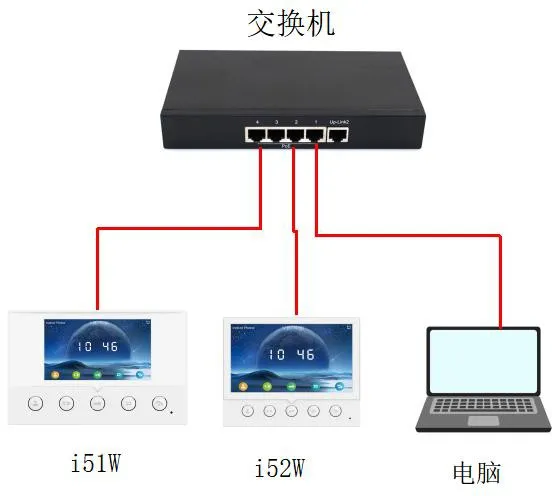
Connect the device and the PC to the same local network.
Download and install the IP scanning tool from the official download page: https://www.fanvil.com.cn/Support/download/cid/30.html.
Set the PC IP address so it is in the same subnet as the device.
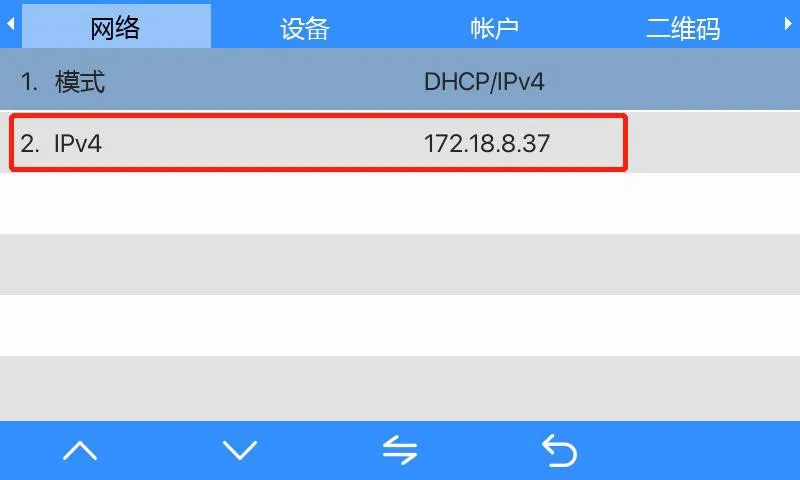
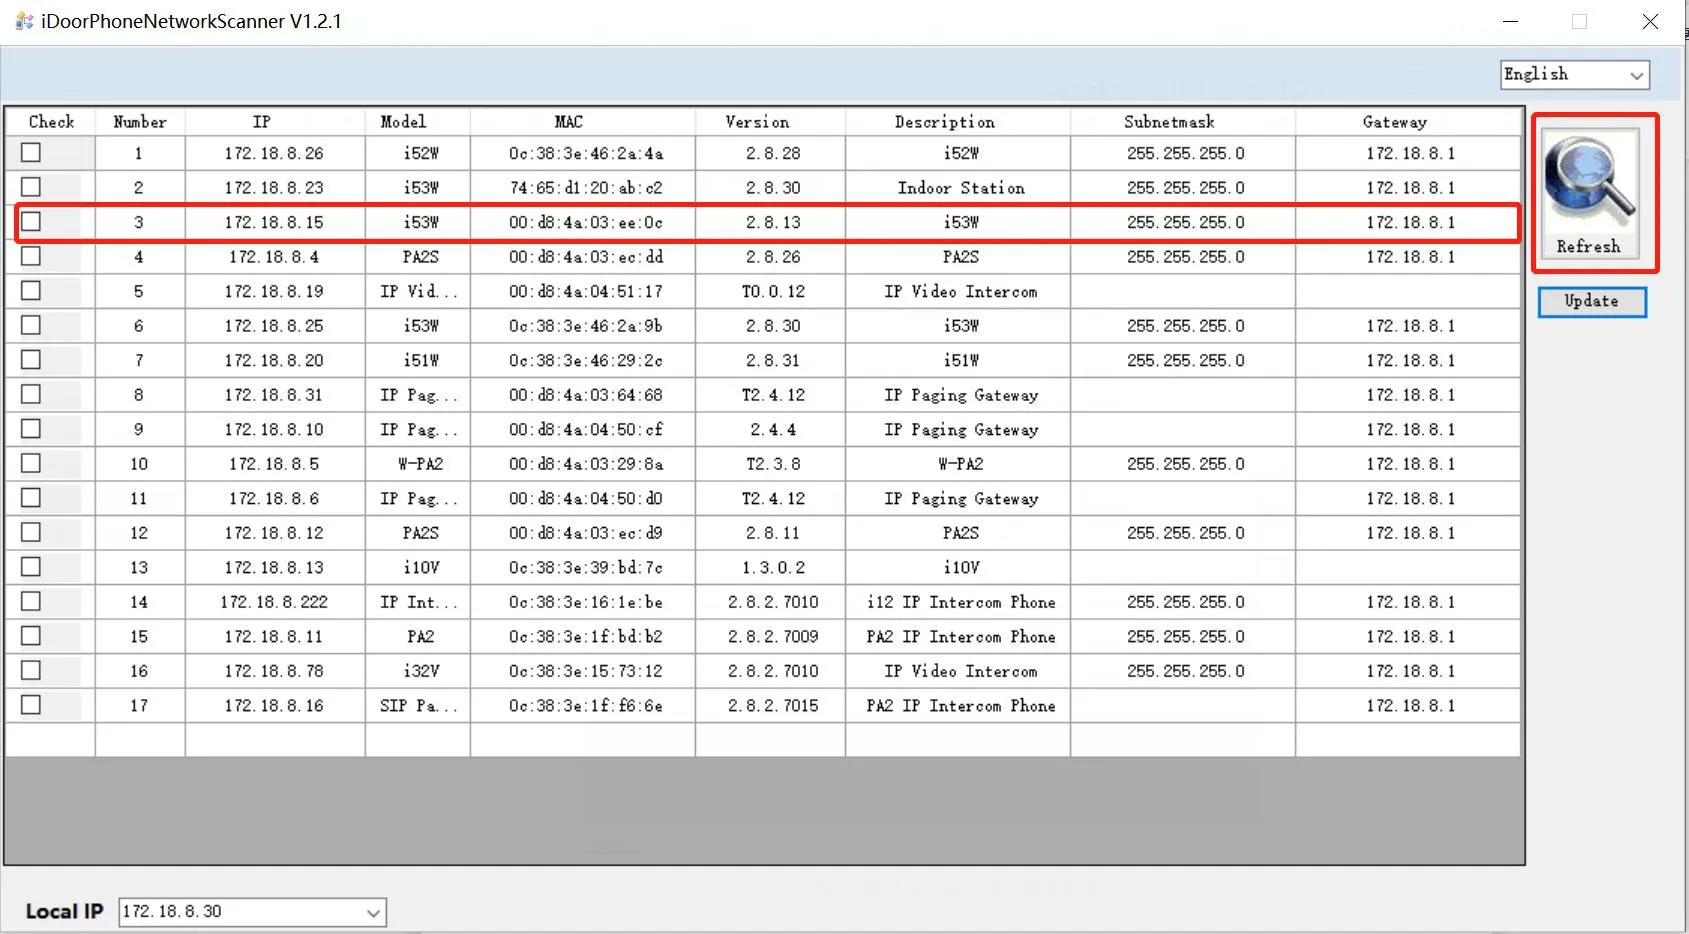
Click Refresh in the scanning tool to detect compatible devices on the LAN and display the detected model and IP address.
Figure 4. Device-to-PC connection diagram for IP scanning.Figure 5. Example scan list showing detected devices and IP addresses.
Checking the IP Address on i53W
Method 1: Check on the device screen
Tap Menu, then go to Status → Network. The current IP address of the i53W will be displayed on the screen.
Figure 6. Viewing the IP address from the i53W screen.
Method 2: Use the IP scanning tool
Connect the i53W and the PC to the same network.
Download and install the IP scanning tool from the official download page.
Make sure the PC is on the same subnet as the device.
Click Refresh to scan the LAN and display the detected device IP address.
Figure 7. i53W connection diagram for IP scanning.Figure 8. IP scan result example for i53W.
Checking the IP Address on i56A
Method 1: Pull down the quick panel
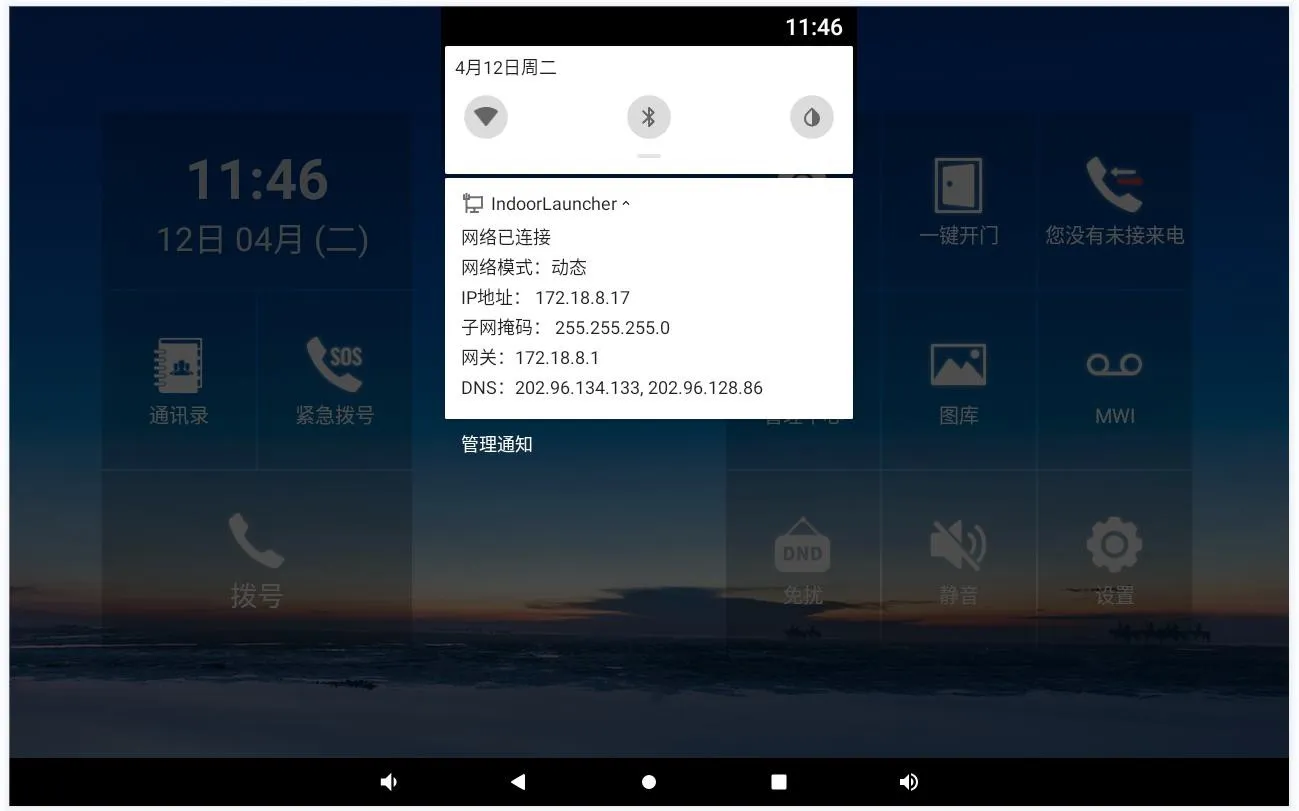
On the i56A, swipe down from the top of the screen to open the quick settings area. The current IP address can be viewed directly from this panel.
Figure 9. Viewing the IP address from the i56A quick panel.
Method 2: Check from the device status page
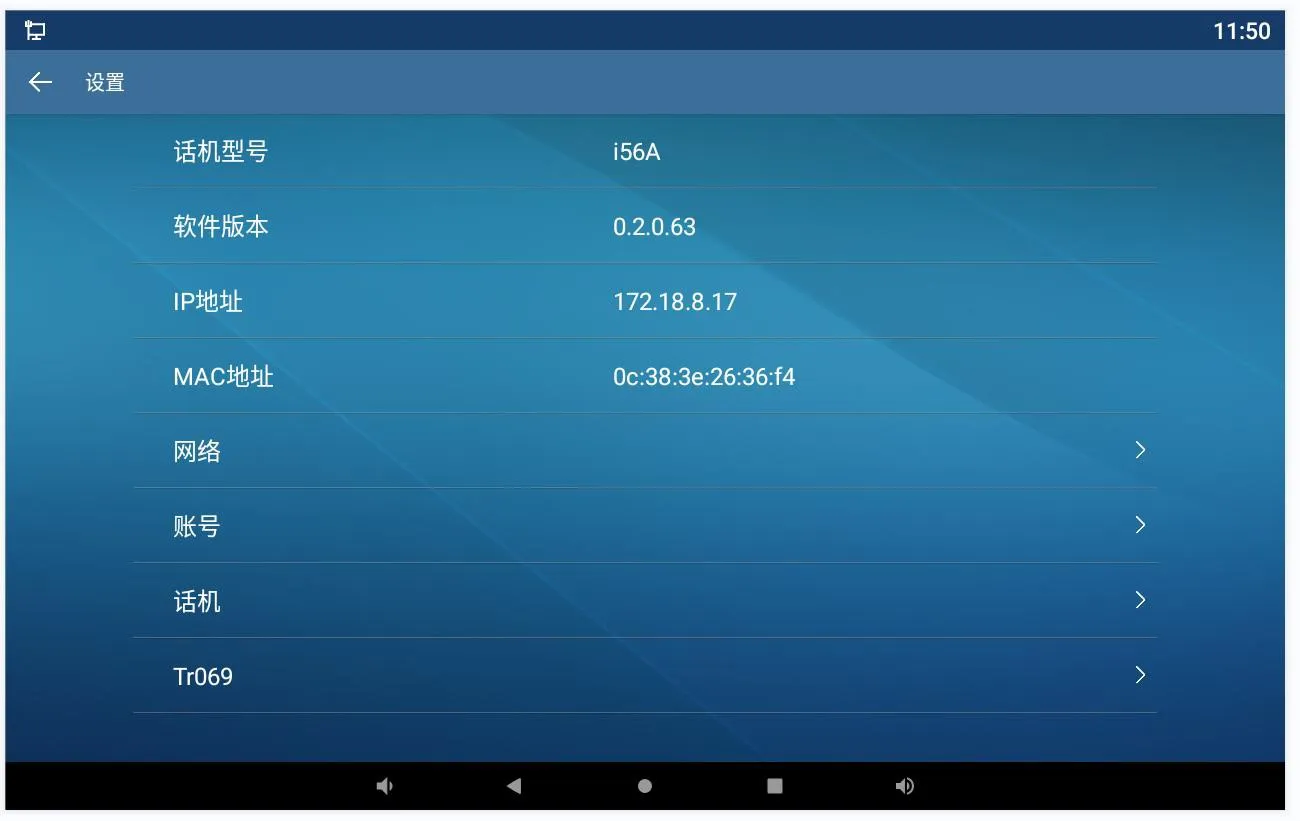
Open Settings → General on the screen and view the current network information to confirm the IP address.
Figure 10. Viewing the IP address from the i56A status page.
How to Set a Static IP Address
Setting a Static IP on i51W and i52W
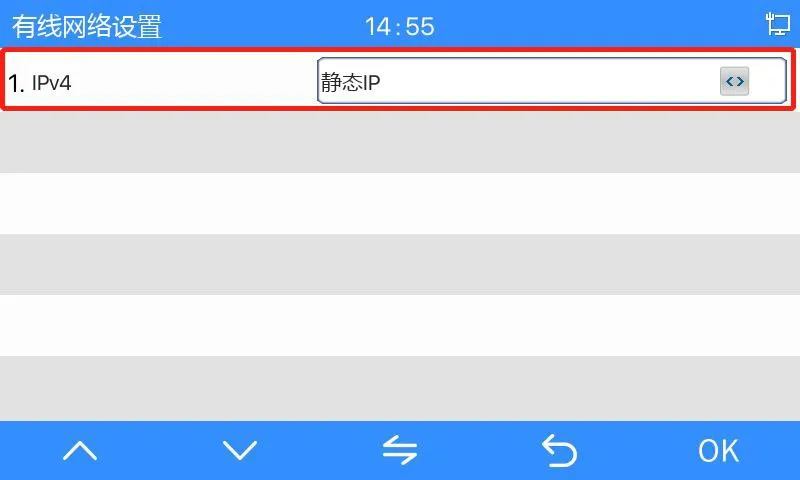
Press and hold the corresponding key for about 3 seconds to enter the menu screen on the i51W or i52W. Then go to Network Settings → Wired Network Settings → IPv4 → Static IP.
Figure 11. Entering the menu on the i51W.Figure 12. Entering the menu on the i52W.Figure 13. Static IP network mode setting on the i51W and i52W.
Important note: On the i51W and i52W, the device-side menu can switch the network mode to static IP, but it does not allow full editing of the static IPv4 address on the local screen. After the mode is changed, the default static IP becomes 192.168.1.178. If you need to modify the address itself, use the web interface instead.
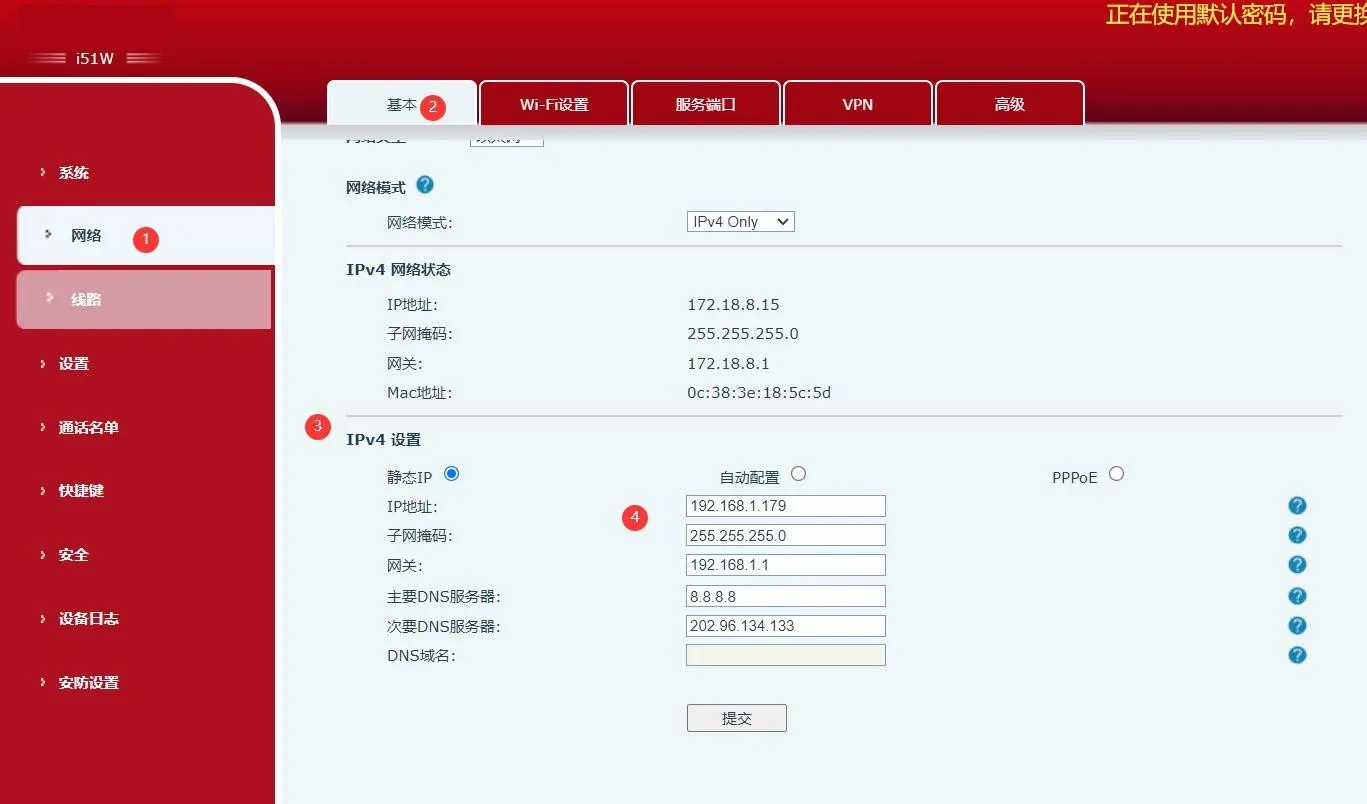
Web configuration method
Enter the current DHCP address, or the default static IP address after switching modes, into a web browser.
Log in to the web interface using the default account credentials: admin / admin.
Go to Network → Basic → IPv4 Settings.
Edit the required static IP address information and save the changes.
Figure 14. Editing the static IP address from the web interface.
Setting a Static IP on i53W
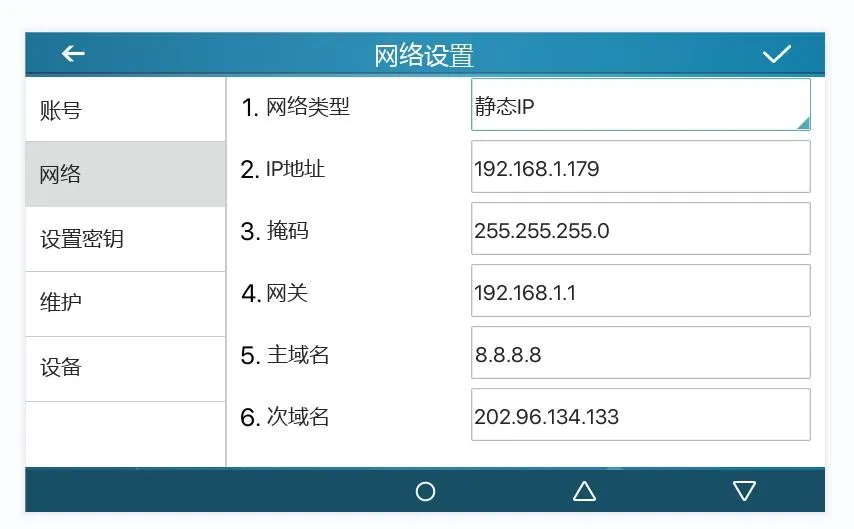
Method 1: Configure from the device screen
Tap Menu → Advanced Settings and enter the default password 123.
Go to Network → Network Settings → IPv4.
Change the network type to Static IP.
Edit the required IP address parameters and save the configuration.
Figure 15. Setting a static IP address on the i53W from the device screen.
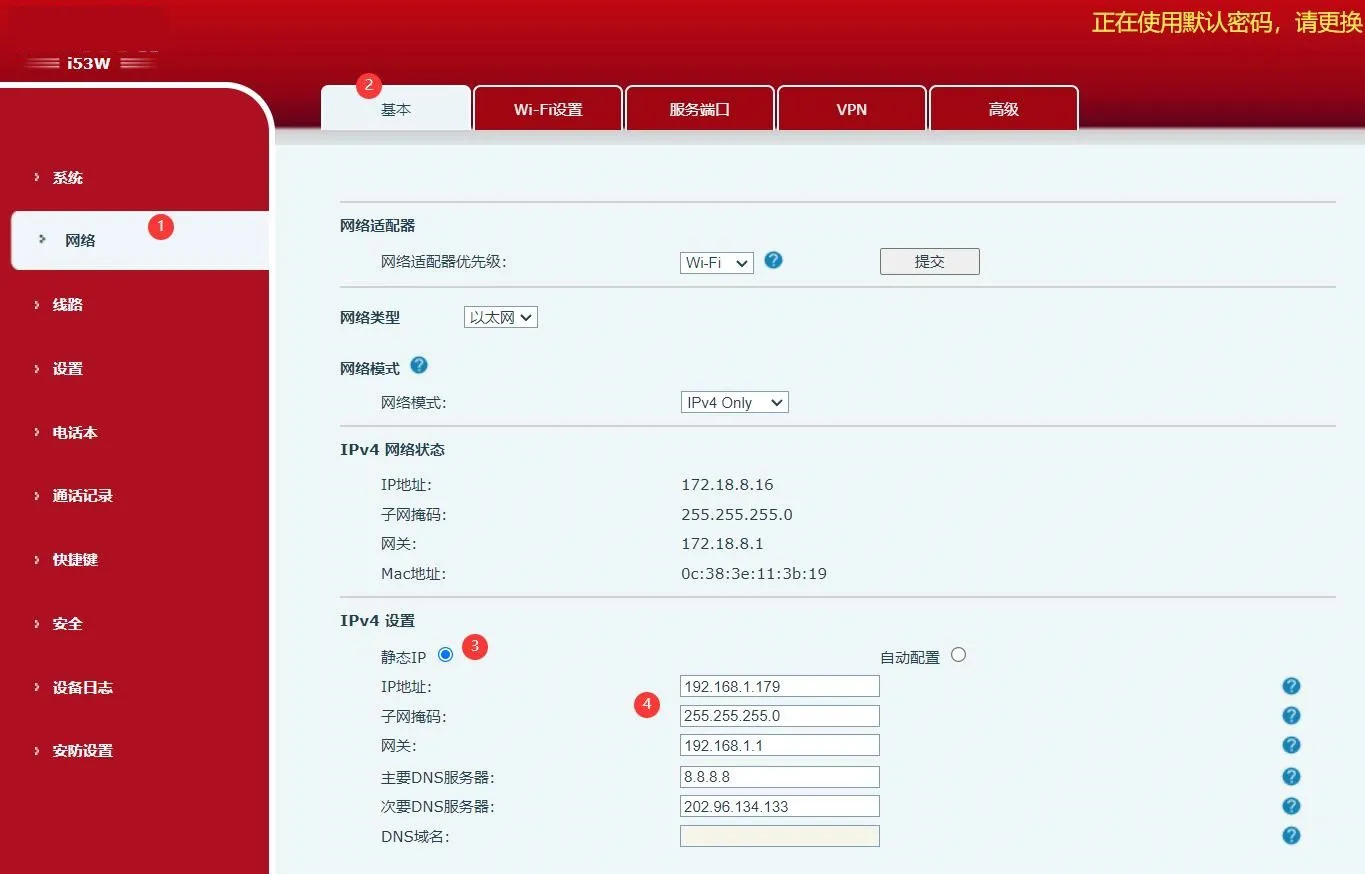
Method 2: Configure from the web page
Enter the device IP address in a browser and open the web interface.
Log in with the default account credentials: admin / admin.
Go to Network → Basic → IPv4 Settings.
Modify the network mode and IPv4 address information as required.
Figure 16. Setting a static IP address on the i53W from the web page.
Setting a Static IP on i56A
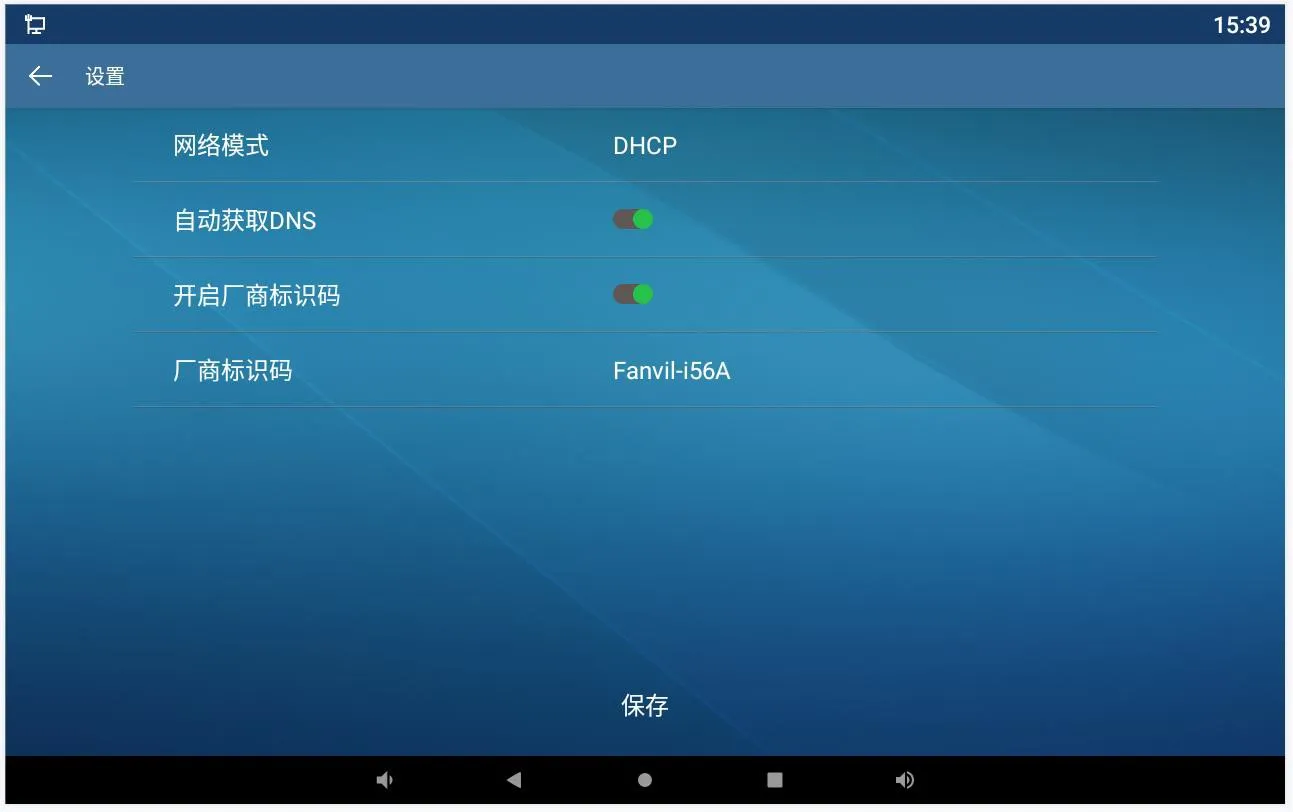
Method 1: Configure from the device screen
From standby mode, open Settings → Advanced and enter the default password admin.
Go to Network → Ethernet.
Change the network mode to Static.
Enter the desired static IP address details and save the settings.
Figure 17. Setting a static IP address on the i56A from the local screen.
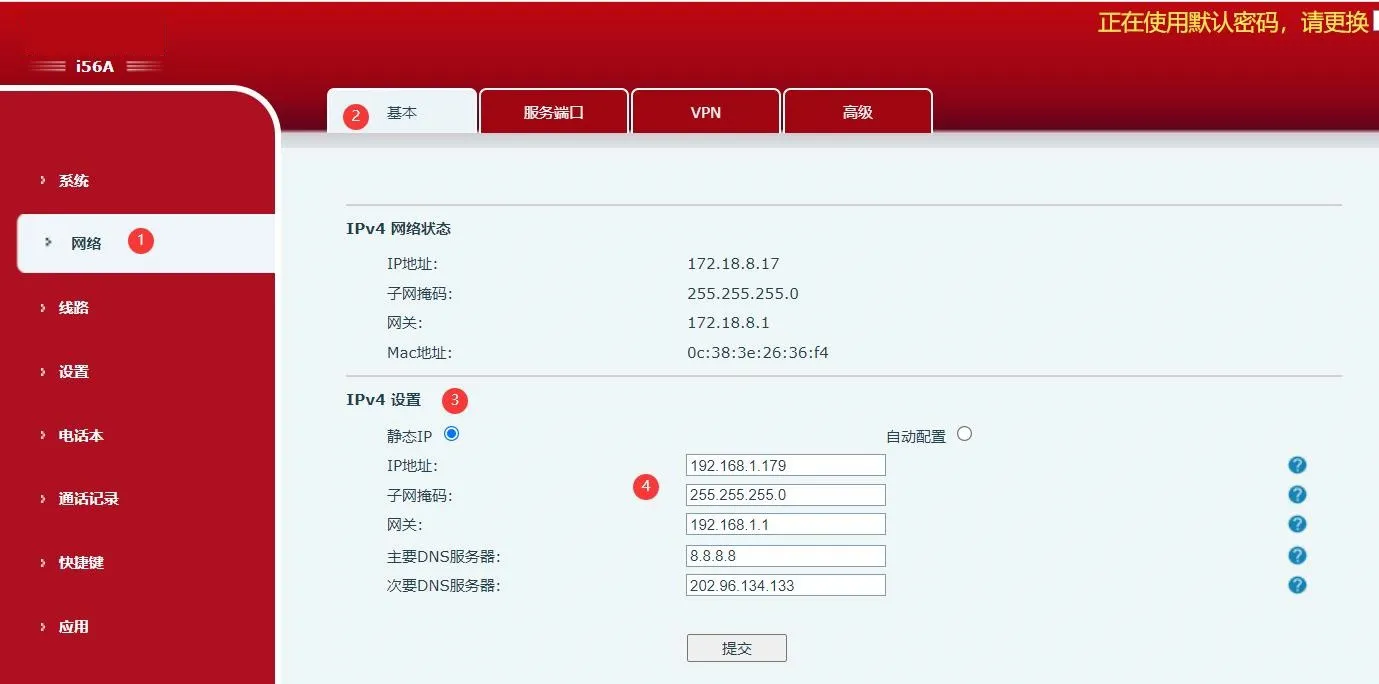
Method 2: Configure from the web interface
Enter the current IP address in a browser to access the web interface.
Log in with the appropriate credentials.
Go to Network → Basic → IPv4 Settings.
Update the IPv4 configuration and save the changes.
Figure 18. Editing the IP address on the i56A from the web interface.
Deployment Notes
When checking or changing the IP address, make sure the device and the PC are on the same reachable network segment. If the device has been switched from DHCP to static IP, confirm the new address before attempting to log in through the browser. During commissioning, it is also recommended to document the final IP address, subnet mask, gateway, and VLAN information for each endpoint to simplify later maintenance.
For large deployments, using a consistent IP addressing plan and verifying each terminal after configuration can help reduce troubleshooting time and improve installation efficiency.
FAQ
Can I see the IP address directly on the device?
Yes. All models covered in this guide provide a local method to view the IP address from the screen or quick settings interface.
Can I set the static IP address directly on i51W and i52W?
You can switch the network mode to static IP on the device itself, but full editing of the static address is completed through the web interface.
Why can’t the IP scanning tool find my device?
In most cases, the PC is not in the same subnet, the device is not powered correctly, or the network connection between the PC and the endpoint is not available.
catalogue
Professional industrial communication manufacturer, providing high reliability communication guarantee!
We use cookie to improve your online experience. By continuing to browse this website, you agree to our use of cookie.
Cookies
This Cookie Policy explains how we use cookies and similar technologies when you access or use our website and related services. Please read this Policy together with our Terms and Conditions and Privacy Policy so that you understand how we collect, use, and protect information.
By continuing to access or use our Services, you acknowledge that cookies and similar technologies may be used as described in this Policy, subject to applicable law and your available choices.
Updates to This Cookie Policy
We may revise this Cookie Policy from time to time to reflect changes in legal requirements, technology, or our business practices. When we make updates, the revised version will be posted on this page and will become effective from the date of publication unless otherwise required by law.
Where required, we will provide additional notice or request your consent before applying material changes that affect your rights or choices.
What Are Cookies?
Cookies are small text files placed on your device when you visit a website or interact with certain online content. They help websites recognize your browser or device, remember your preferences, support essential functionality, and improve the overall user experience.
In this Cookie Policy, the term “cookies” also includes similar technologies such as pixels, tags, web beacons, and other tracking tools that perform comparable functions.
Why We Use Cookies
We use cookies to help our website function properly, remember user preferences, enhance website performance, understand how visitors interact with our pages, and support security, analytics, and marketing activities where permitted by law.
We use cookies to keep our website functional, secure, efficient, and more relevant to your browsing experience.
Categories of Cookies We Use
Strictly Necessary Cookies
These cookies are essential for the operation of the website and cannot be disabled in our systems where they are required to provide the service you request. They are typically set in response to actions such as setting privacy preferences, signing in, or submitting forms.
Without these cookies, certain parts of the website may not function correctly.
Functional Cookies
Functional cookies enable enhanced features and personalization, such as remembering your preferences, language settings, or previously selected options. These cookies may be set by us or by third-party providers whose services are integrated into our website.
If you disable these cookies, some services or features may not work as intended.
Performance and Analytics Cookies
These cookies help us understand how visitors use our website by collecting information such as traffic sources, page visits, navigation behavior, and general interaction patterns. In many cases, this information is aggregated and does not directly identify individual users.
We use this information to improve website performance, usability, and content relevance.
Targeting and Advertising Cookies
These cookies may be placed by our advertising or marketing partners to help deliver more relevant ads and measure the effectiveness of campaigns. They may use information about your browsing activity across different websites and services to build a profile of your interests.
These cookies generally do not store directly identifying personal information, but they may identify your browser or device.
First-Party and Third-Party Cookies
Some cookies are set directly by our website and are referred to as first-party cookies. Other cookies are set by third-party services, such as analytics providers, embedded content providers, or advertising partners, and are referred to as third-party cookies.
Third-party providers may use their own cookies in accordance with their own privacy and cookie policies.
Information Collected Through Cookies
Depending on the type of cookie used, the information collected may include browser type, device type, IP address, referring website, pages viewed, time spent on pages, clickstream behavior, and general usage patterns.
This information helps us maintain the website, improve performance, enhance security, and provide a better user experience.
Your Cookie Choices
You can control or disable cookies through your browser settings and, where available, through our cookie consent or preference management tools. Depending on your location, you may also have the right to accept or reject certain categories of cookies, especially those used for analytics, personalization, or advertising purposes.
Please note that blocking or deleting certain cookies may affect the availability, functionality, or performance of some parts of the website.
Restricting cookies may limit certain features and reduce the quality of your experience on the website.
Cookies in Mobile Applications
Where our mobile applications use cookie-like technologies, they are generally limited to those required for core functionality, security, and service delivery. Disabling these essential technologies may affect the normal operation of the application.
We do not use essential mobile application cookies to store unnecessary personal information.
How to Manage Cookies
Most web browsers allow you to manage cookies through browser settings. You can usually choose to block, delete, or receive alerts before cookies are stored. Because browser controls vary, please refer to your browser provider’s support documentation for details on how to manage cookie settings.
Contact Us
If you have any questions about this Cookie Policy or our use of cookies and similar technologies, please contact us at support@becke.cc .